Getting started with firebase authentication
Motivation and target audience
This blog is geared towards the architects and developers who want to familiarize themselves with the workings of the firebase-authentication. The concepts discussed here would be very relevant to the other IDaaS providers as well. In this blog post, we also provide a comprehensive example to setup a firebase project, create simple front-end and backend services and protect the services using firebase-authentication.
The code repository for the examples discussed in this post can be found here. Interested readers can clone the repository to play around with the working version, or follow this post for a more detailed understanding.
Introduction
Google’s firebase is a suite of tools, geared towards creating secure and scalable modern applications. In this post will focus on firebase-authentication. Firebase Authentication supports Email/Password, Federated ID provider integration (github, facebook, google), phone number authentication, anonymous logins out of the box. You can also hook in your custom authentication backend (if you want), and let firebase take care of only the authentication mechanism. You will be amazed to see how quickly you can secure your applications using firebase by leveraging industry standards like OAuth, OpenID Connect etc. Firebase-authentication also simplifies the process of email verification, password resets, access revokation and a lot more with just a few lines of code.
We will kick off this blog post by understanding authentication in more traditional settings and then compare its architecture with a firebase authenticated application.
Side Note: Google has rebranded firebase-authentication for their Cloud Platform as Identity Platform offering. Once you have read through this post, you will also understand how Identity Platform works as most of the details are similar.
Traditional architecture
Lets start with discussing a simple backend service, authenticated using a username and password.
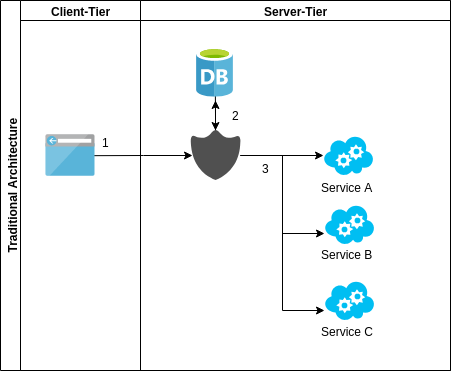
The different components involved in this architecture are A client which is typically a web browser or an app (iOS/android), set of services which represent the features/api resources and an Authentication backend providing features to:
- Store username and password (not in plain-text hopefully)
- Authenticating and authorizing each request against data-store(database, ldap etc)
- Additionally maintaining a session for each client.
Whenever a client wants to access services, 1> Client submits their credentials to server 2> Server validates the credentials against the database. If correctly authenticated, establishes a session with client. 3> Before accessing the services (A, B or C), server checks for a valid client-session and uses the database (or session variables) to get the access based information. This is repeated for each request.
Firebse (IDaaS) architecture
In this architecture, we divide the application into 3 tiers: Client, Authentication provider (Firebase in our case) and Server (Services A, B, C etc). Here, in contrast with the traditional systems, the authentication tier is completely separate from both the client and the server.
In such an architecture, both client and the server are aware of the authentication provider (Firebase project) and communicate with the provider via their own SDKs. Client directly authenticates against firebase project using a client-sdk and recieves a token. Client then sends this token as a header (or body) in an http request to the server. Before any of the services are called, the server uses an admin-sdk to validate the incoming token. If the token is valid, the server can provide access to the requested services. This is explained in the image below.
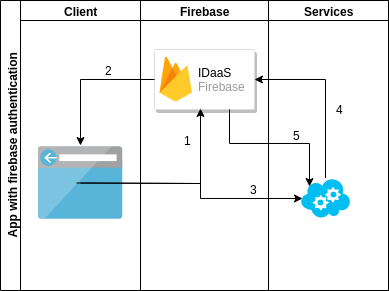
- 1: Client uses client-sdk to authenticate against firebase.
- 2: On successful authentication, firebase returns a token (id-token) to the client.
- 3: Client requests the server to access service(s), with id-token recieved in step 2, in the request header.
- 4 and 5: Server uses admin-sdk to verify id-token sent by the client. If the token is verified, the server responds to the client.
This approach provides a few unique advantages over the traditional authentication:
- Scalability: Authentication backend and the services can scale independently.
- Management: The authentication is completely managed by the IDaaS provider.
- Lightweight: No need for server to maintain separate sessions for each client.
- Speed of development: Developers focus on actual business problems instead of managing the authentication platform.
- Add-on features: Google analytics, performance monitoring, cloud messaging etc.
Getting hands dirty
Before getting into the dirty details, lets quickly understand 2 important sdk types that firebase offers.
- The client-sdk, which is strictly used to perform client centric operations like signin and signout, retrieving the id-token for the logged-in user, changing/resetting the password, emailing etc. The purpose of the client-sdk is to ease the common client-side features. Client sdk always operates in the context of the current logged-in user. It is available for popular client side platforms like web (javascript), android, ios, unity etc.
- The admin-sdk, which operates on the information sent by the client. For example token minting and verification, user management, access control via claims, user import etc. Admin sdk always runs in the context of the firebase administrator. It is used at the server-side and is available in most programming language like Java, Golang, C#, Python, nodejs.
In our example, we will create a firebase project and use client-sdk to login, from a web client. We will then, write backend services (A and B) and use admin-sdk to protect these services. If you want to try out the examples yourself, you can head over to this github repository and follow the readme instructions.
Creating a firebase project
Sign in to firebase console using your your google credentials, to create a firebase project. After you login, choose your pricing plan and you are ready to go. Usually, the spark-plan that offers a free tier would suffice, but be aware of its limitations. Check the reference section at the end of the blog for pricing details. Once you have selected the pricing plan, click on a new project on firebase-console, give your project a unique name, read terms and conditions, save and you are ready to start.
For this project, we need to enable a few settings that will be used in the client and the admin sdk.
-
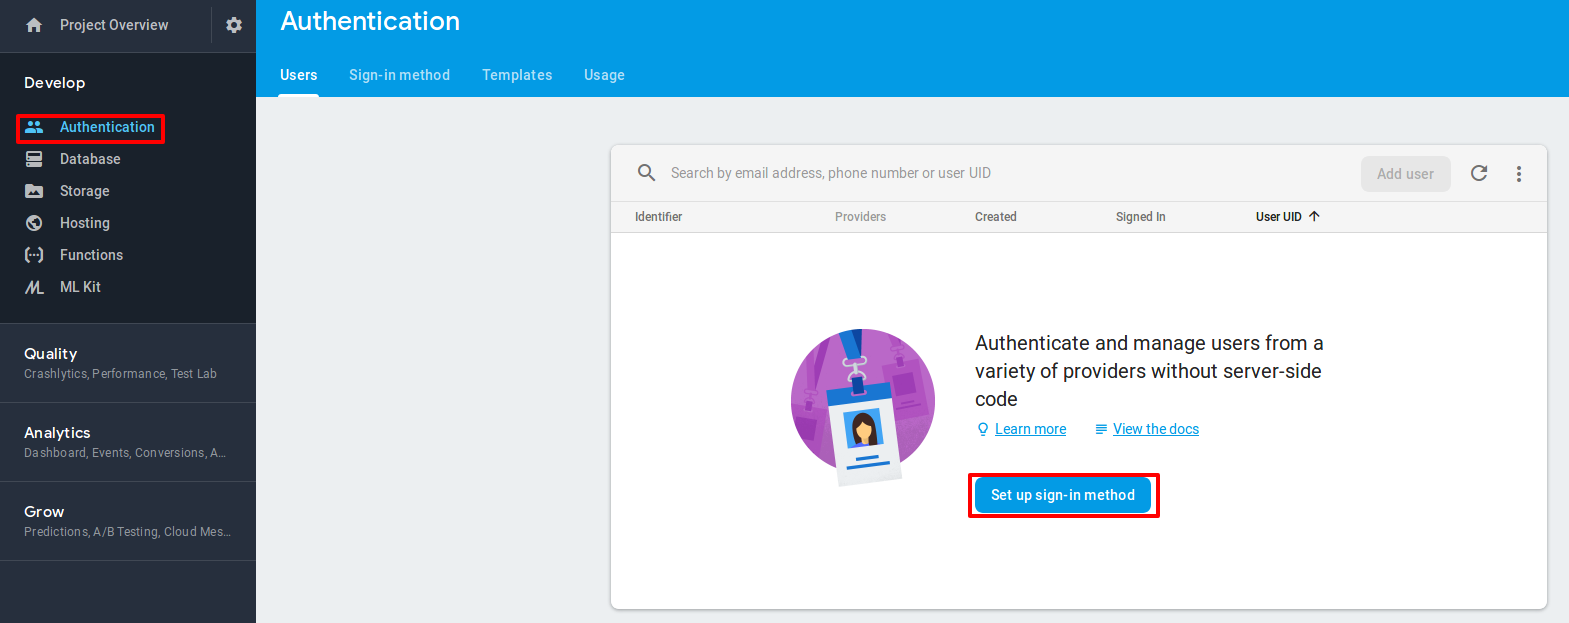
Click on “Authentication” in the sidebar, and click “Setup sign in method”
-
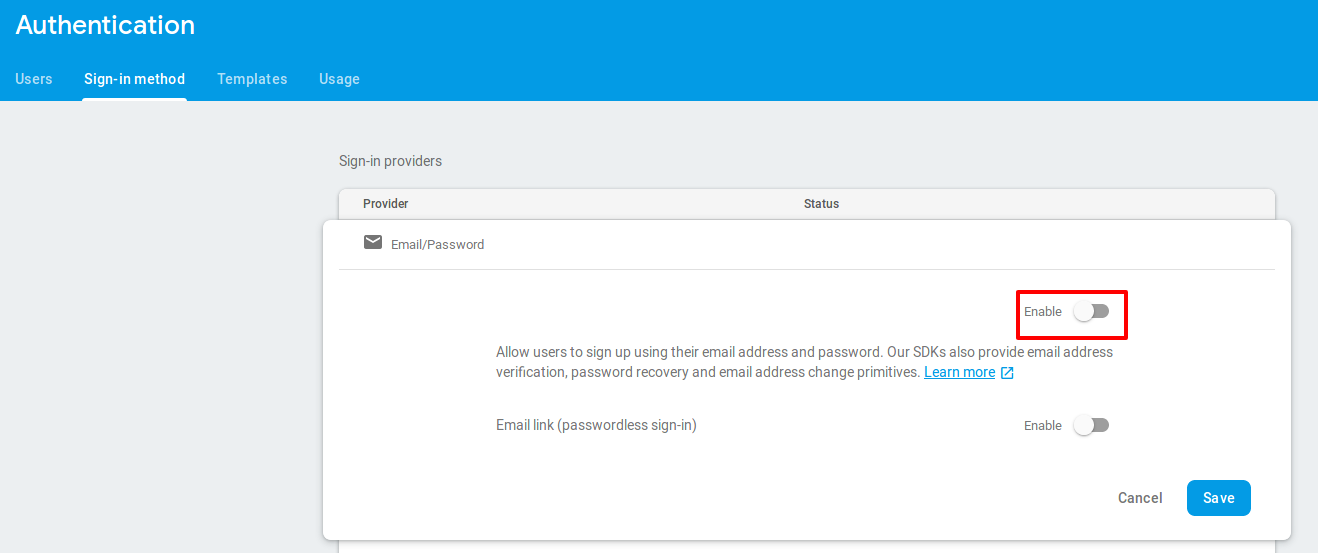
On the next screen select email-password as sign-in provider.
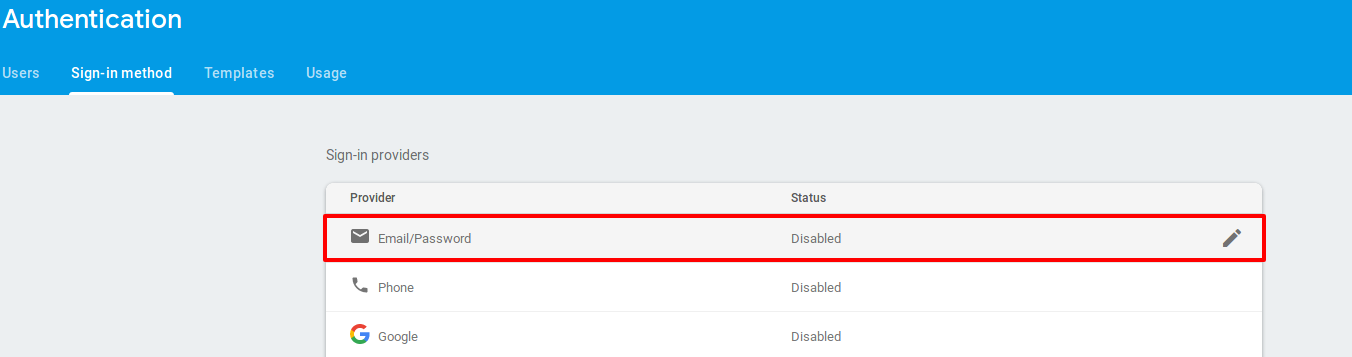
- Enable email-password setting as shown below and save.
-
From the same page, note the Authorization domain, we will need it for the next section
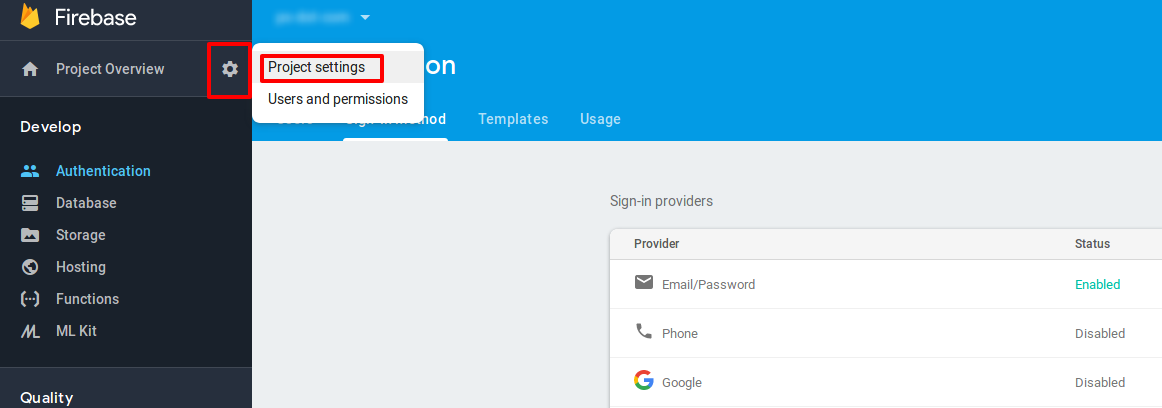
- Find project-id and web-api-key by clicking on “Project Overview > Project Setting” on the left top of firebase console. Check the below screenshot for reference.
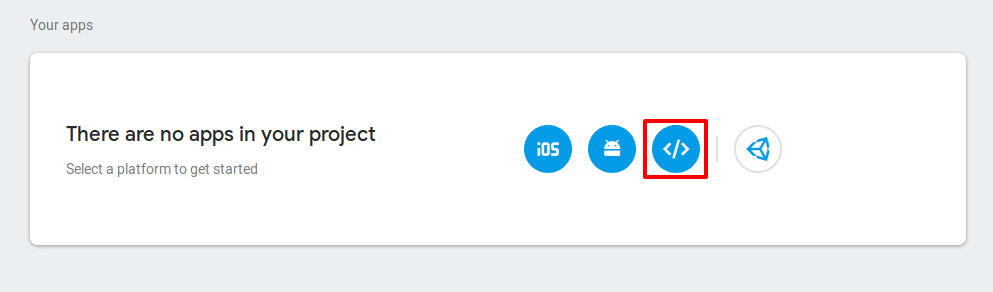
- You will be navigated to the project settings page. Note the project-id and Web API Key for the project. Once done, under settings select the option to add a web app to the project.
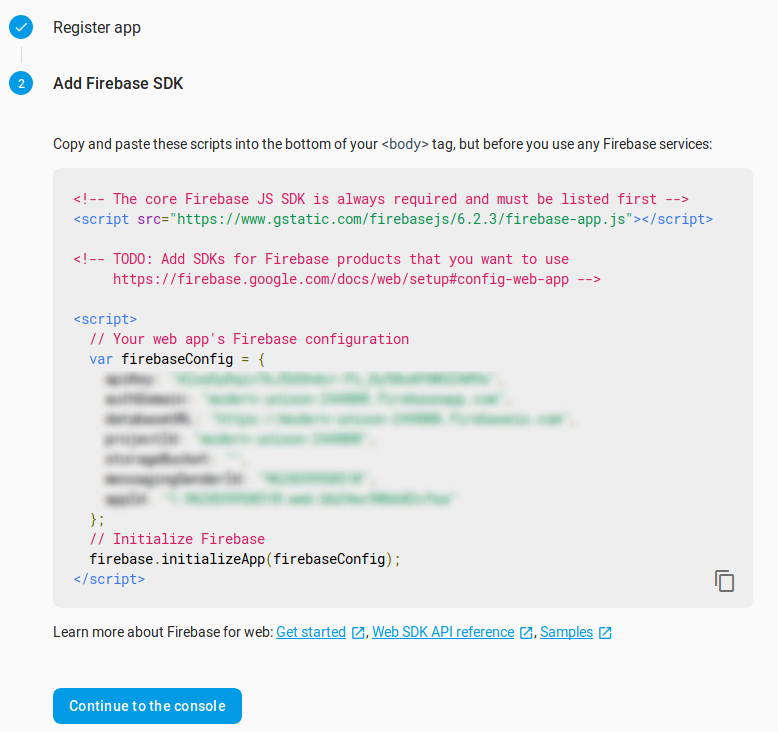
- Provide the name for the app, save the settings and you will be presented with the screen below. Save these details for configuring the client-sdk in the next step.
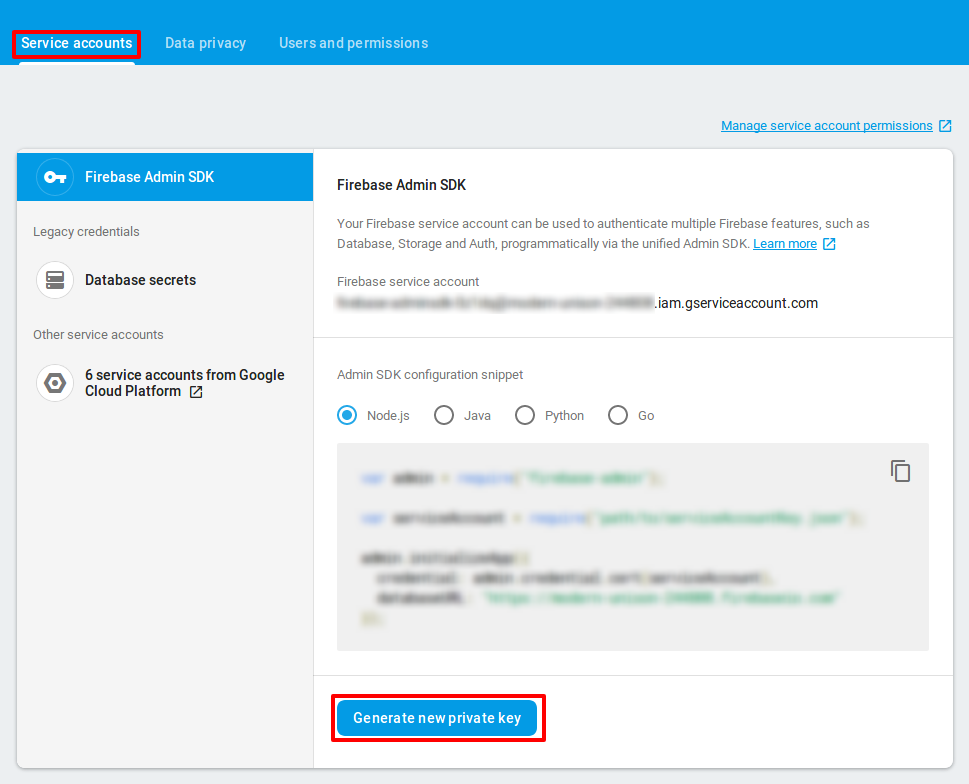
Now, all we need is the private-key required for the admin-sdk. On the same page go to Service Account, and click on “Generate a new private key” to download the secret key.
For more details checkout this documentation.
Writing backend services
Clone the github repository on your machine. The backend services are written in go. Make sure you have Go (version > 1.11) installed. To write backend services, which can work with firebase, we need the service-account credentials file. Copy the private key that you have downloaded earlier and save it as “fb.json” under the root of your project directory.
Navigate to the main.go file in the project, you have cloned. You can see below that
- we use Go admin sdk for communicating with firebase project.
- we use credentials file to authenticate against firebase project.
- we create a client to verify the tokens
import (
	firebase "firebase.google.com/go"
	"firebase.google.com/go/auth"
	"google.golang.org/api/option"
)


// initialize firebase app
// you should use your service account file here.
opt := option.WithCredentialsFile("fb.json")
if app, err = firebase.NewApp(context.Background(), nil, opt); err != nil {
	e.Logger.Fatalf("error initializing app: %v", err)
}

// create a client to communicate with firebase project
if client, err = app.Auth(context.Background()); err != nil {
	e.Logger.Fatalf("error creating firebase client: %v", err)
}

// use the client to verify the id token sent by client
t, err := client.VerifyIDToken(context.Background(), idToken)
if err != nil {
	// .. do something
}
Using client sdk for web
Navigate to the public directory under the project root. You will find index.html,dashboard.html and signup.html files. In each of these files, replace the firebaseConfig settings with your firebase project settings.
let firebaseConfig = {
    apiKey: "your-api-key",
    authDomain: "your-project-id.firebaseapp.com",
    databaseURL: "https://your-project-id.firebaseio.com",
    projectId: "your-project-id",
    storageBucket: "",
    messagingSenderId: "your-messaging-sender-id",
    appId: "your-app-id"
};
The project is now set up with our client and admin SDKs. We are ready to run the project now.
Running the project
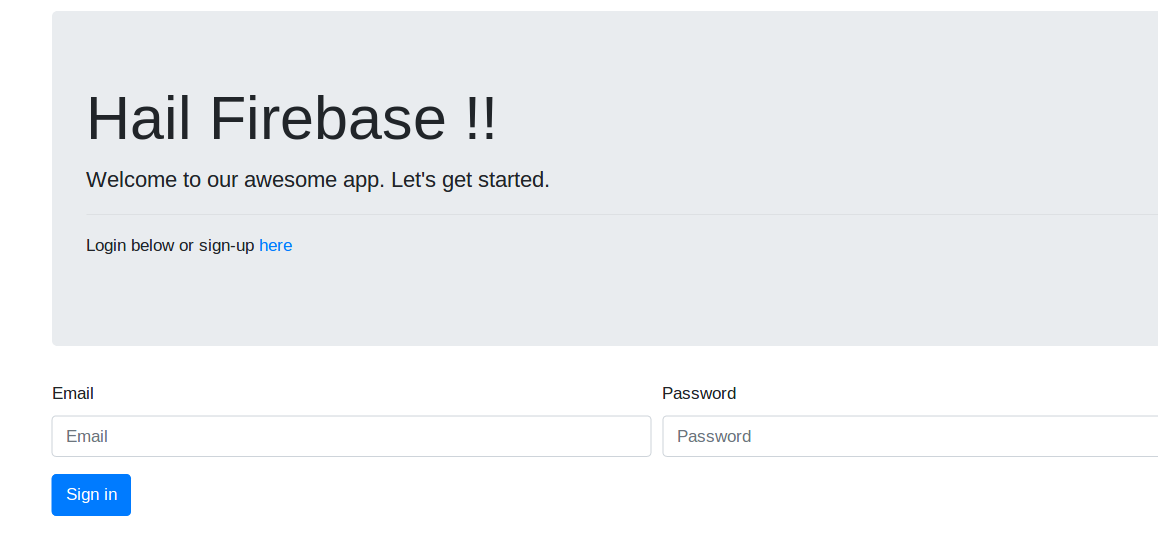
To run the project, follow the instructions on the README.md file in the github repository. Once the application is running, you should be able to navigate to the application on http://localhost:1313. If everything is fine, you will be presented with the following screen.
At this point, you are all set. You can experiment with different options and settings. Few notable feature that you could try are
- Sending account creation / confirmation emails.
- Send password reset emails.
- Deleting accounts from admin-sdk.
- Revoking / disabling users.
Conclusion
Firebase auth offers a lot more than what can be covered in a single blog post. It covers a vast number of authentication scenarios. It comes with sane defaults that can be customized easily for advanced usage. Also, the spark-pricing plan is amazing to try out for proof of concepts and hobby projects. But as with any managed service, always read the terms and conditions and thoroughly check out their pricing plan.
In this post we have barely scratched the surface of what firebase-auth offers. There are a lot various scenarios it can cover. At Sysco AS, we use firebase along with Google Cloud Platform to create a multitenant authentication platform and so far we are really impressed with its offerings. We will keep sharing our experience on firebase. Watch this space for more content.
Credits and references
- Official Firebase documentation
- Admin SDK features
- Client SDK guides for different platforms
- Firebase auth with Google AppEngine
- Firebase pricing
- Firebase pricing FAQ
- Download Go runtime
- Installing Go
- Firebase-Auth godoc
Note: This content originally appeared here. It has been altered at places to suite guidelines of this forum.