Using a storage simulator on Oracle VM
Using a storage simulator on Oracle VM
Several times system administrators want to review how to configure Weblogic installations on shared storages to implement high availability architectures, but the lack of equipment is a great obstacle. Fortunately, because of the use of virtualization it is possible to simulate the process of creating LUNs on a storage, presenting them to the initiator and mounting them on a Linux server. This post is an exercise where the instructions published by [1] Oracle (2015) and [2] Ness, Andrew (2011) are implemented. This first step will be the base to develop a virtualized architecture to simulate the high availability of the Administration Server in future posts.
I. Oracle Storage simulator installation process
1) The appliance was imported according to the steps stated in [1] Oracle (2015, p. 3) 2) The following configuration was applied
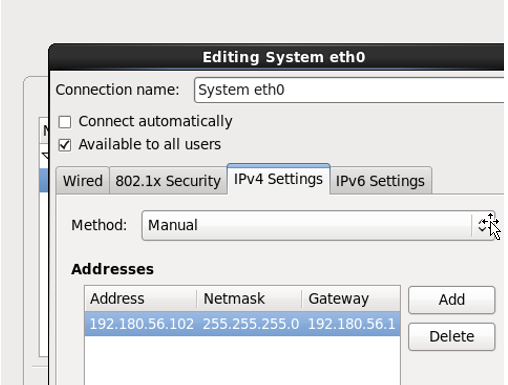
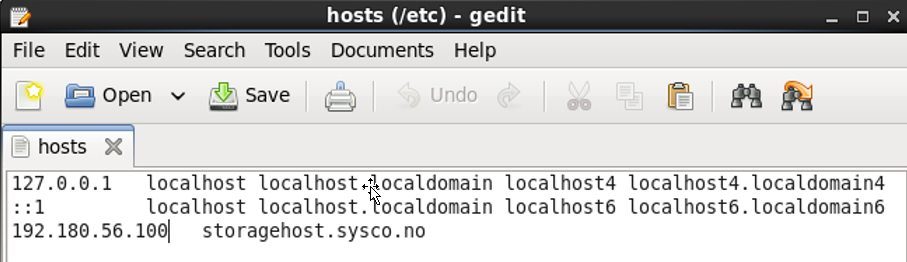
Hostname: storagehost DNS Domain: sysco.no IP Address: 192.180.56.100 IP Netmask: 255.255.255.0 Default Router: 192.180.56.1 DNS Server: 192.180.56.1 Password: sysco01
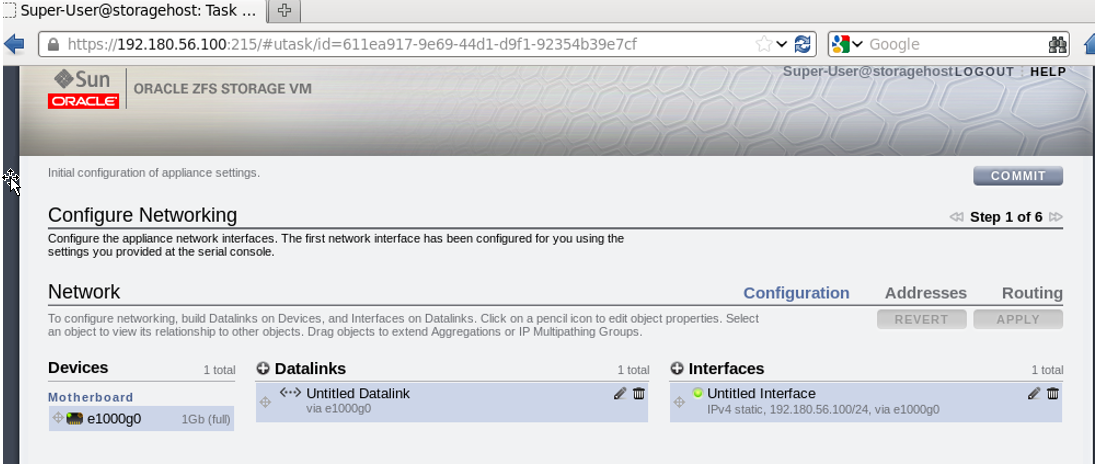
3) After configuring the network, we have:
https://storagehost.sysco.no:215/ https://192.180.56.100:215/
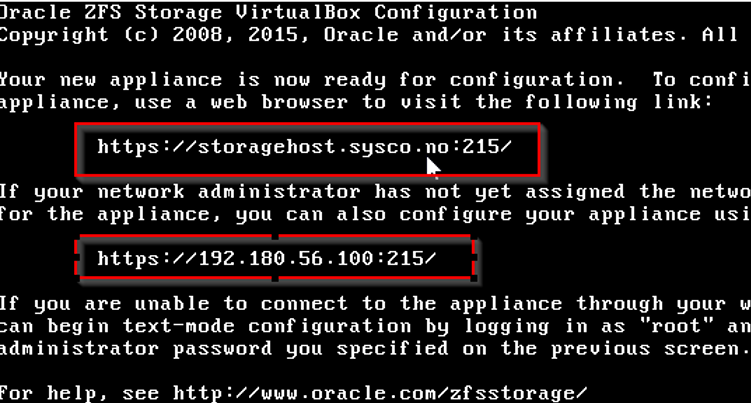
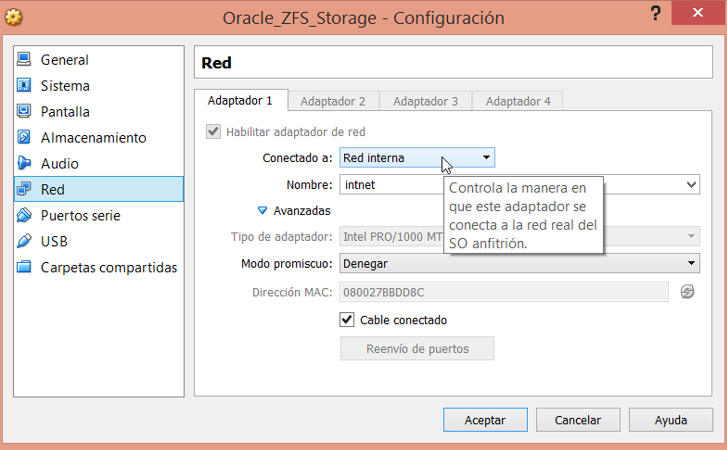
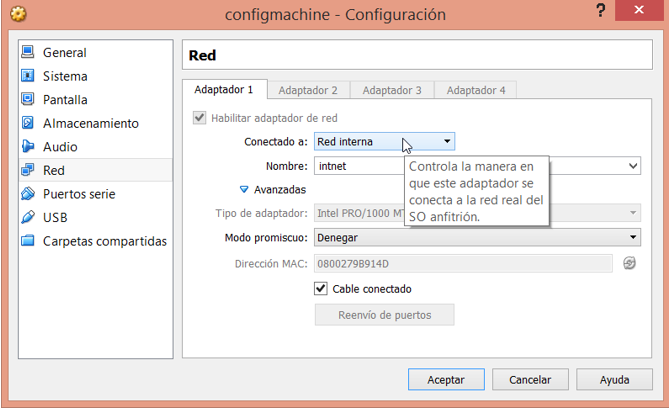
In addition, the Internal Network was set to communicate the appliance with other virtual nodes.
4) I have a machine to configure the storage. This machine is called: configmachine.sysco.no
User: root Password: sysco01
This machine also uses the Internal Network in order to connect to the storage appliance.
In addition its host file is configured to see the storage node
5) Storage configuration
After the first login this page appears. In this case click Commit and go to the next step
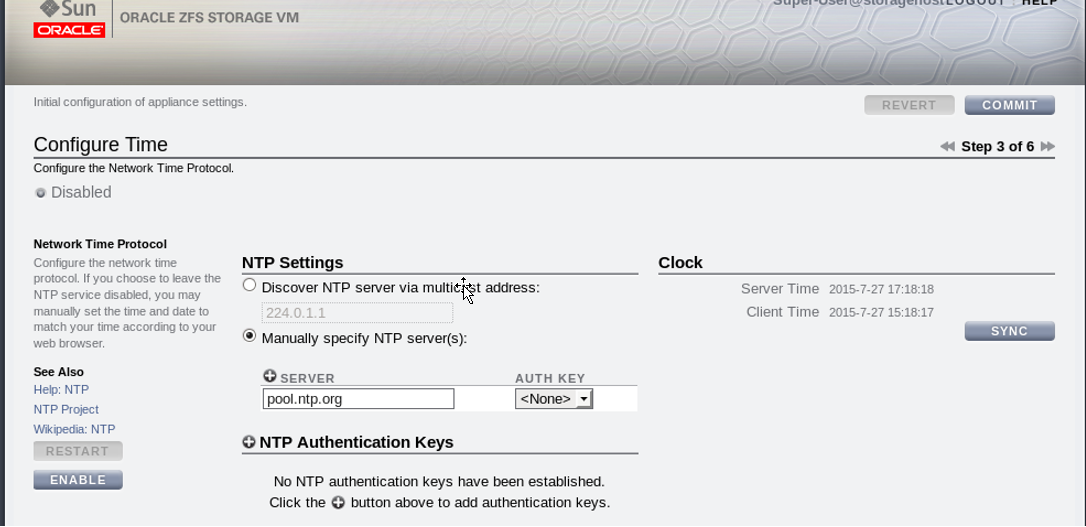
Information about the DNS domain and server is filled, click on Commit.

Click on commit
Click on commit
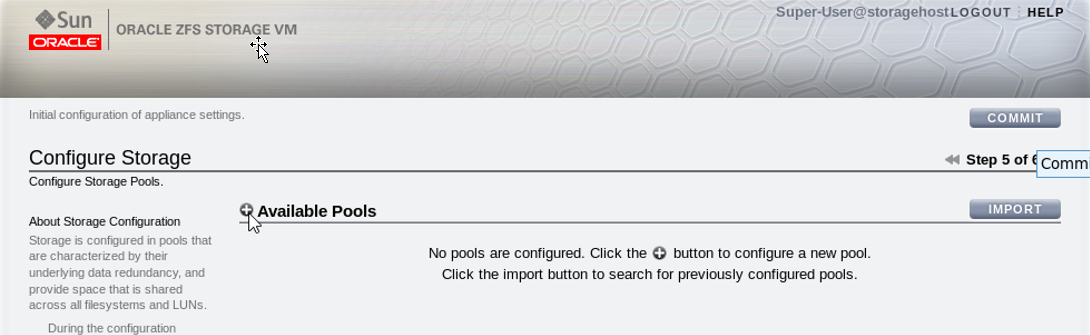
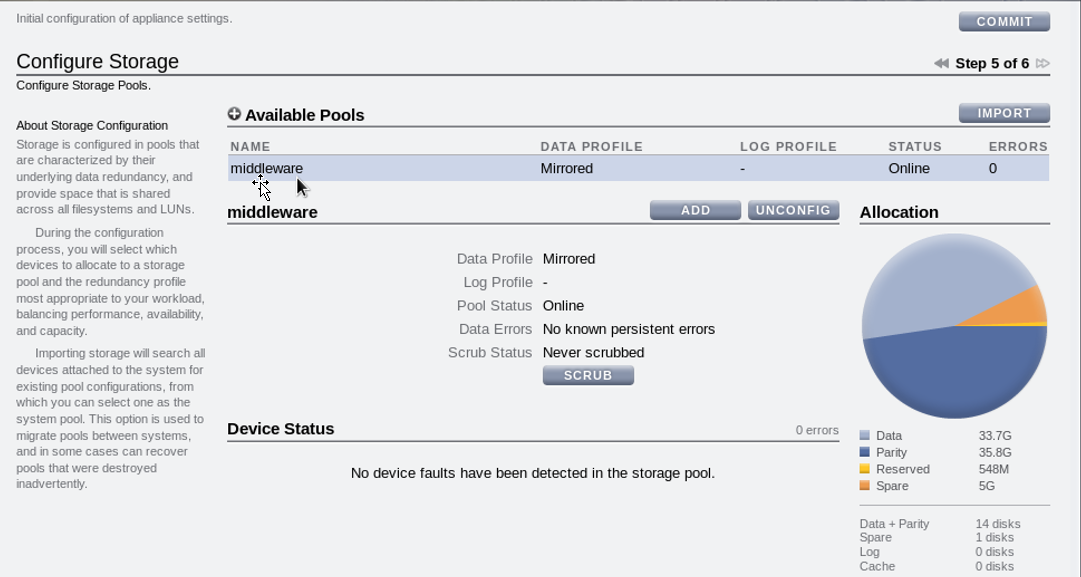
Click on the + symbol to add a pool.
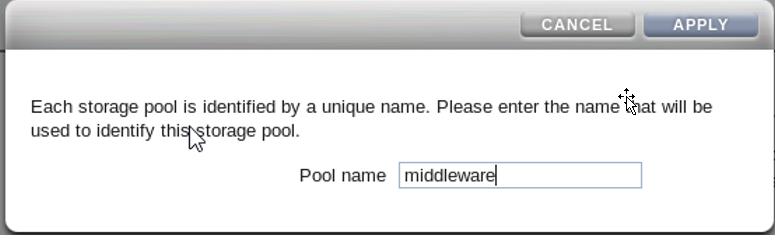
Give a name to the new pool
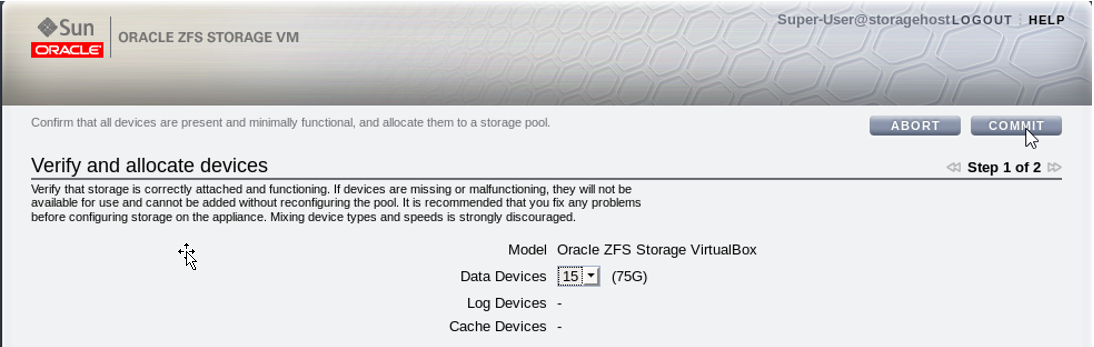
Set the space for the pool
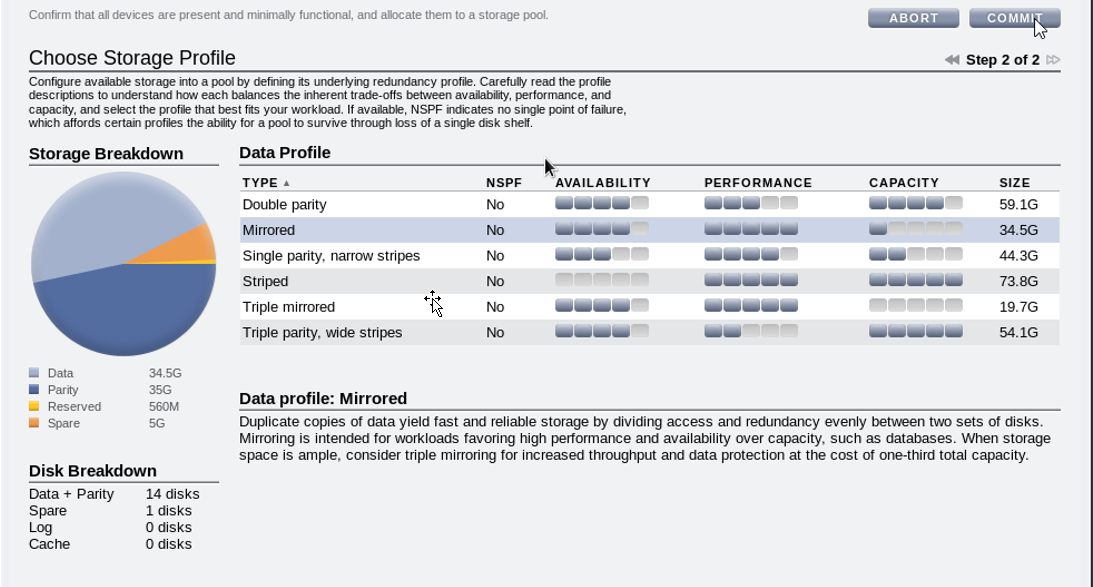
You have to use a data profile. In this case the Mirrored data profile was selected. Click on commit to continue.
Click on commit to continue with the configuration process.
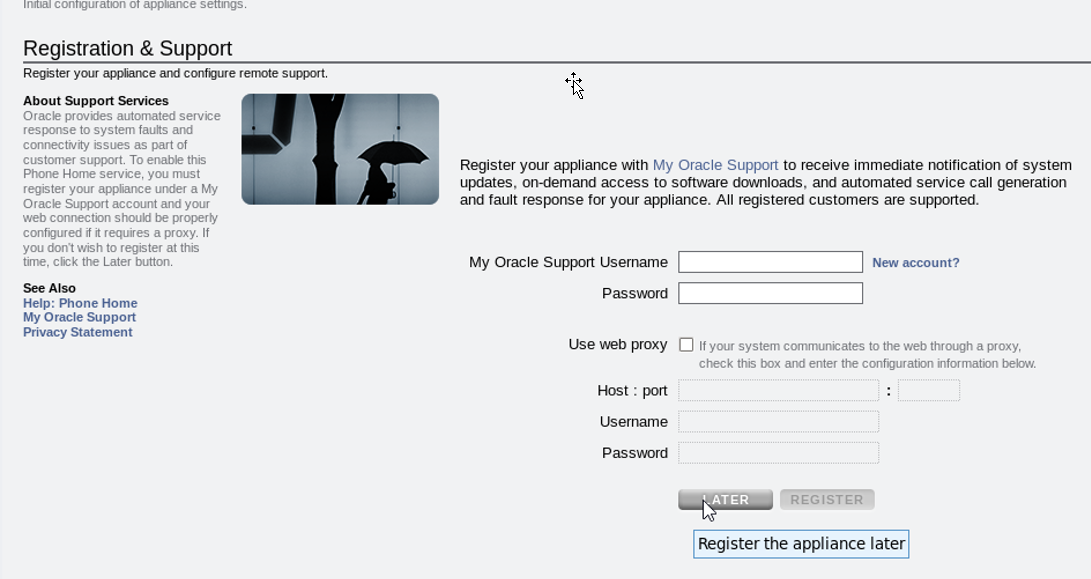
Click on Later.
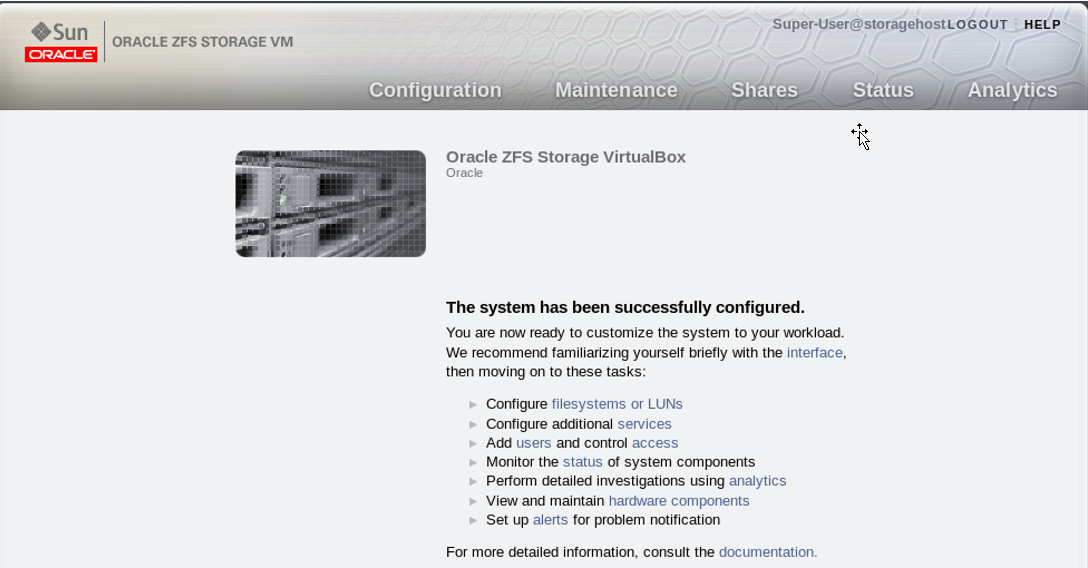
Now the Oracle ZFS storage is configured.
II. First exercise – iSCSI in a Linux environment
In this exercise the instructions stated by [2] Ness, Andrew (2011) to create ISCSI targets, file system and LUNS, to use it from the machine called configmachine.sysco.no, will be tested. These are the screens.
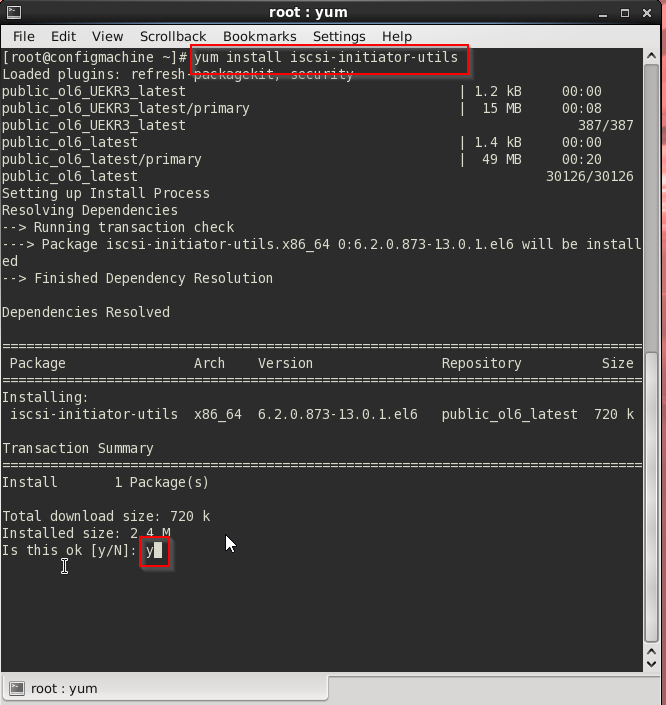
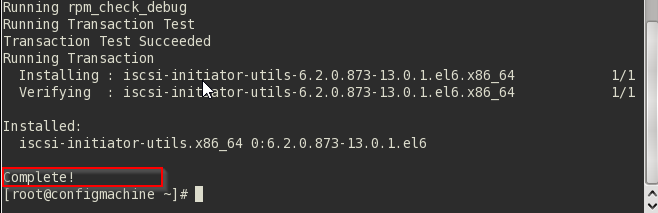
1) Installation of Oracle Linux iSCSI initiator.
Downloading and installing the packages.
2) Configuring the iSCSI initiator to start on reboot
According to the instructions stated by [2] Ness, Andrew (2011) it is possible to check that services are ready to start on reboot so additional configurations are not needed.

3) Identification of the host IQN.
This is the identification used by the SUN ZFS Storage Appliance to recognize the initiator host. This IQN is generated during the installation of the iSCSI initiator package (Oracle, 2011).
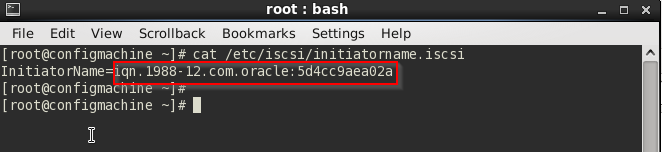
In this exercise the iSCSI Qualified Names (IQN) is: iqn.1988-12.com.oracle:5d4cc9aea02a
4) CHAP Authentication The file /etc/iscsi/iscsid.conf will be edited to enable CHAP authentication and to set the credentials that will be defined in the SUN ZFS Storage Appliance. According to [2] Ness, Andrew (2011) the file is set in this way.
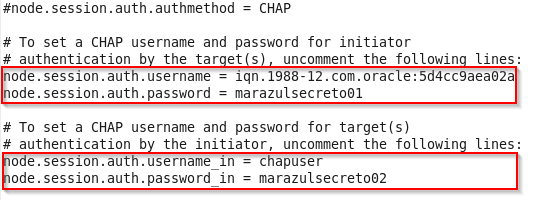
In the first case the IQN generated during the installation of the iSCSI initiator package is used as username. In the second case a user that will be defined on the storage is set.
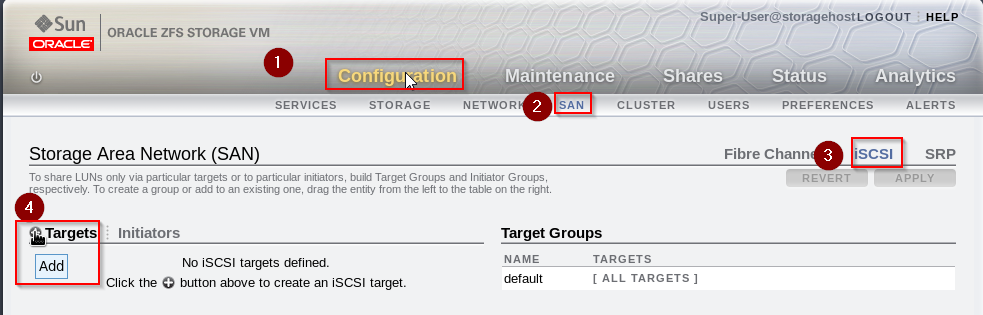
5) Creating a iSCSI target group In this case the browser user interface (BUI) will be used to create a target group on the ZFS Storage Appliance. In order to do this, do the following
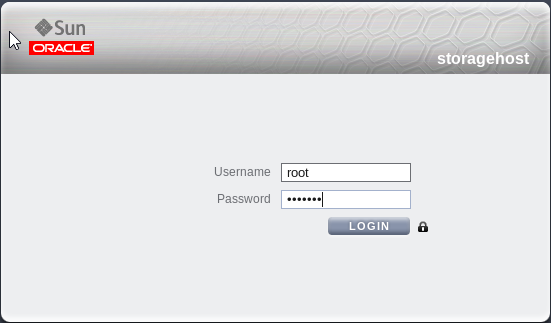
Access to the BUI, in this case is: https://storagehost.sysco.no:215/
Login with the root user.
Follow this sequence Configuration>SAN>iSCSI>Targets
The iSCSI target is set to use the user and password established previously. Authentication mode: CHAP User name: chapuser Password: marazulsecreto02

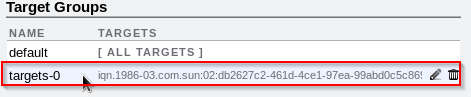
Now the iSCSI target has to be dragged and dropped on the Target Groups section to generate a new Target Group.

The Target Group called targets-0 is created.
6) Defining an iSCSI initiator
This section sets the relationship between the initiator (in this case an Oracle Linux client called configmachine.sysco.no) and the storage host. This mechanism allows us to restrict which initiators have access to a volume. Whit this in mind, the volume is protected from inconsistencies caused by multiple writes from different hosts. The common configuration sets a relationship between an initiator and a volume. In other cases, cluster file systems has to be used [2] Ness, Andrew (2011).
The IQN generated by the client must be used to relate the storage with the initiator. These are the steps.
Follow the sequence of steps shown in this picture SAN>iSCSI>Initiators
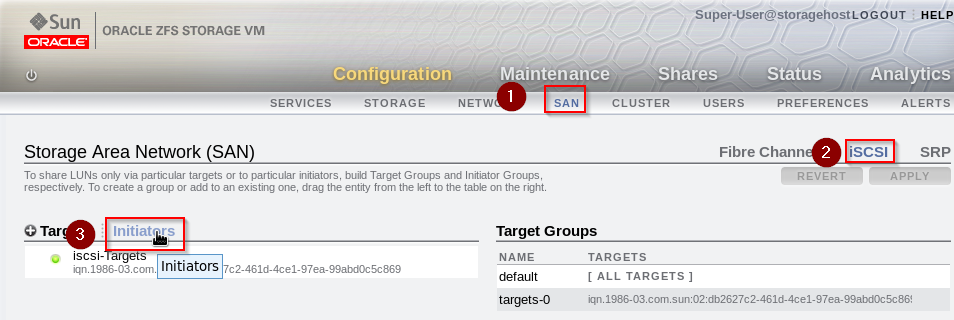
Click on Add

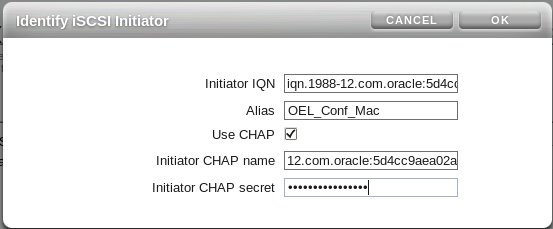
The IQN generated during the installation of iSCSI initiator package in addition to the user and password set previously must be used in this screen
Initiator IQN: iqn.1988-12.com.oracle:5d4cc9aea02a Initiator CHAP name: iqn.1988-12.com.oracle:5d4cc9aea02a Initiator CHAP password: marazulsecreto01
7) Defining an initiator group
An initiator group is useful to define a logical group that uses common iSCSI commands for its members. For example, when a cluster is used, its members are grouped using this [2] Ness, Andrew (2011).
These are the steps to create an initiator group Configuration>SAN>iSCSI>Initiators>Drag the new initiator
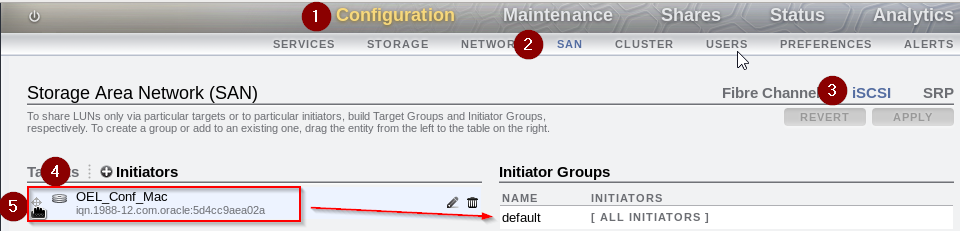
In the fifth step the initiator is dragged and dropped into the Initiator Groups area. This is the result.

In the previous screen you have to click on Apply to finish the process.
8) Defining a Sun ZFS Storage Appliance Project
A project allows the aggrupation of related volumes and the inheritance of properties for file systems and LUNs [2] Ness, Andrew (2011).
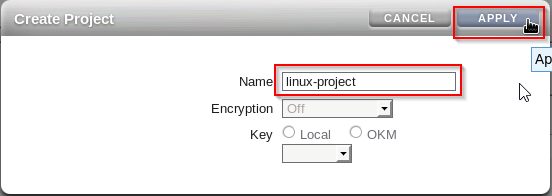
In order to create a project follow this sequence Shares>Projects>Add a project.
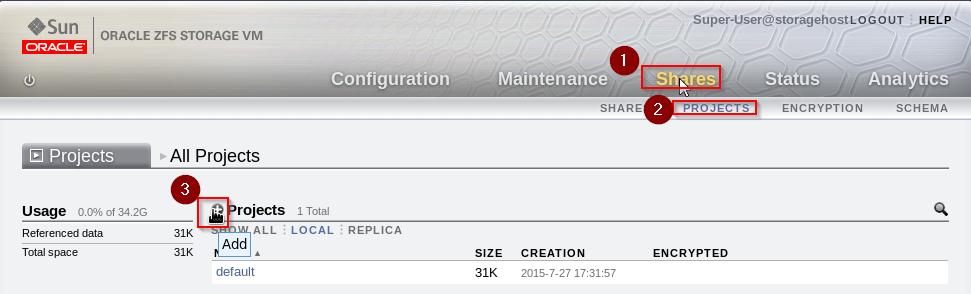
Set the name of the project and click on Apply.
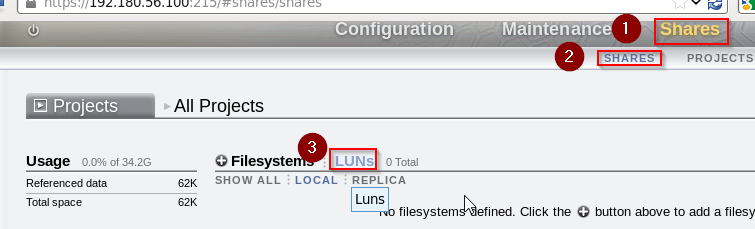
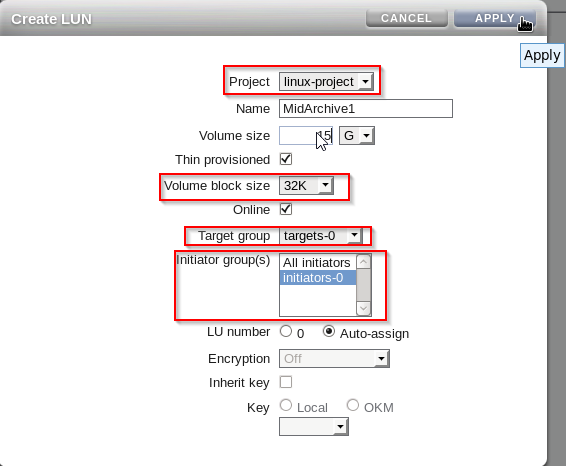
9) Creating a LUN
In order to create a LUN follow this sequence Shares>SHARES>LUNs
Now click the symbol to add a LUN. In the following screen the Project, Target group and Initiator group configured during this exercise are used to create the LUN [2] Ness, Andrew (2011). In addition, a block of 32K is used because this LUN will have an EXT3 file system [2] Ness, Andrew (2011).
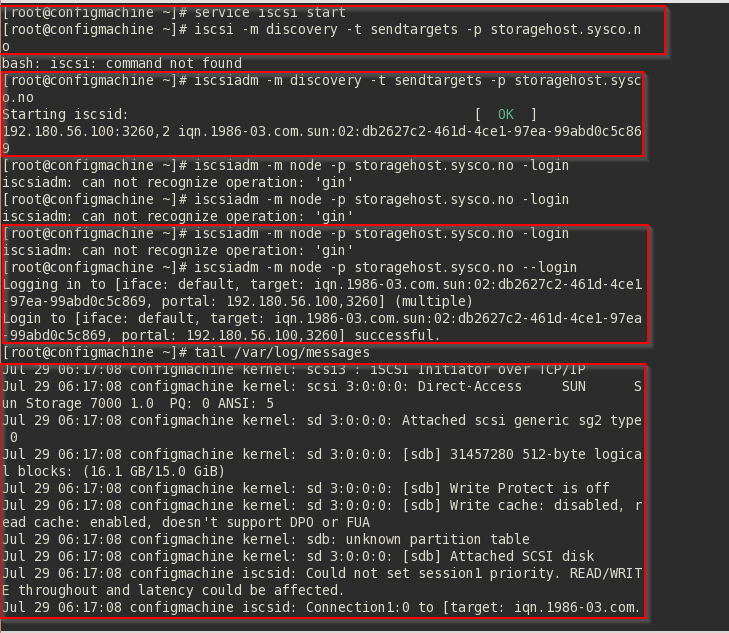
10) Configuring the LUN to be used by the Oracle Linux Server (configmachine.sysco.no) These are the screens generated after following the instruction stated by [2] Ness, Andrew (2011)
a. Initiate the iSCSI session with the Sun ZFS Storage Appliance. First of all it is necessary to fix a little mistake. According to [2] Ness, Andrew (2011) you have to execute this command:
iscsciadm –m mode –p storagehost.sysco.no –login
However, the previous command generates this error: iscsiadm can not recognize operation ’gin’. Thus, execute:
iscsciadm –m mode –p storagehost.sysco.no –login


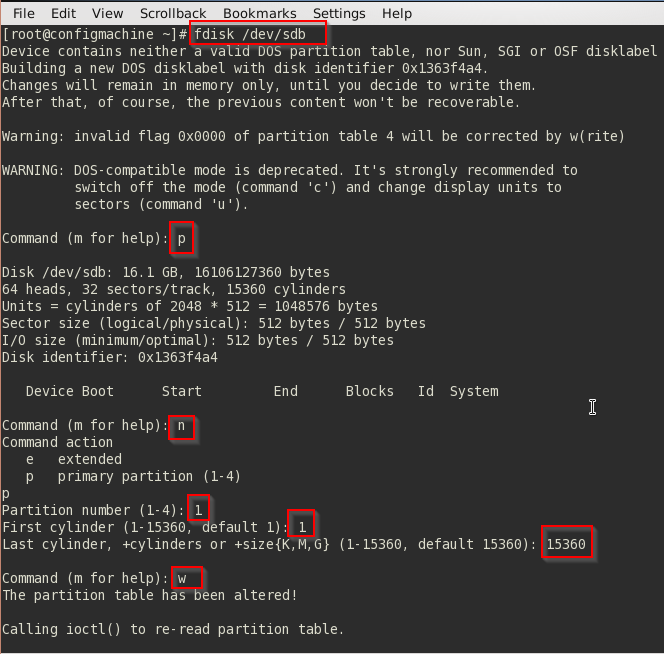
b. Preparing the LUN and creating a partition
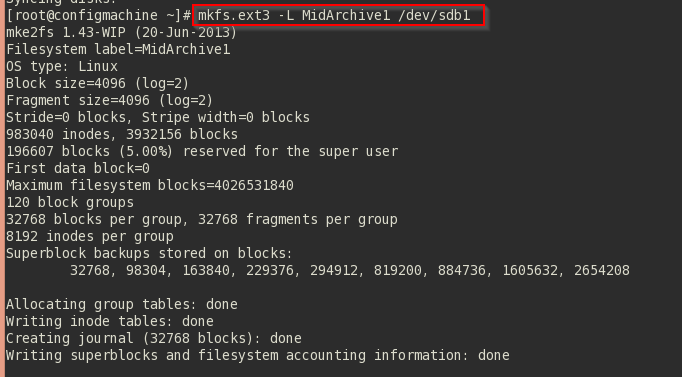
c. Configuring the device as a large EXT3 File System
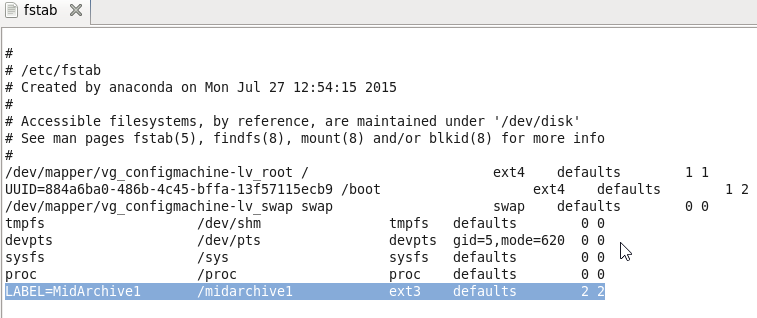
Add the remarked line in the file /etc/fstab
Now it is time to create the folder /midarchive1 and mount it.
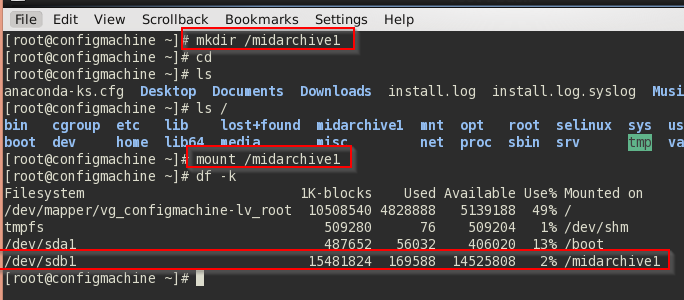
As can be seen in the previous picture now the system has a file system mounted on /midarchive1 and almost 15 GB available.
References list
[1] Oracle (2015) Oracle ZFS Storage Appliance Simulator Quick Start Guide [Online document] Available from: http://download.oracle.com/otn/utilities_drivers/servers-storage/storage/open-storage/sunstorage7000/SimulatorGuide.pdf?AuthParam=1437987413_d79ca620b3091e94c712b8d43dac93d7 (Accessed: 27 July 2015)
[2] Ness, Andrew (2011) Using Sun ZFS Storage Appliance iSCSI LUNs in an Oracle Linux Environment [Online document] Available from: http://www.oracle.com/technetwork/articles/servers-storage-admin/o11-104-iscsi-luns-linux-518400.html#Initiator (Accessed: 28 July 2015)